Slang's Anti-Singularity
  • Slanghome
  • Slangblog
  • Slangpuzzles
    • CurrentPuzzles
    • ScholarPuzzle
    • PastPuzzles

Counting Occurrences of One String in Another Using VBA

5/14/2013

0 Comments

 
I needed to determine the number of times one particular string occurred as part of a larger string. Specifically, I needed to determine how many tabs were at the start of a line of text in order to convert to a properly nested indent (i.e., for each tab, I needed to indent .5").

Poking around, I knew I could parse out the string and iterate through a counter for each time I found the string. Cumbersome, but doable. I'm lazy, and didn't want to type that many lines of code, so I thought about it a little more and thought the built in Split() function could be leveraged to do what I need.

Indeed, that was the case and the resulting code is shown below:

Public Function CountCharacter(ByVal theString As String, ByVal strSearchChar As String) As Integer
Dim iCount As Integer
Dim myarray() As String
     myarray = Split(theString, strSearchChar)
     iCount = UBound(myarray)
     CountCharacter = iCount
End Function

The code does exactly what I hoped, is case-sensitive, and can be used to count the number of occurrences of any text element in any other text element. In my specific case, to search for the number of tabs at the start of a line, I used a range object to identify the text and passed the vbTab constant as the search character:

     MsgBox "The number of tabs in the line is " & CountCharacters(myRange.Text, vbTab)

Of course, a selection object's text attribute can be passed as well, or any string variables if you've already done some processing on a piece of text from a document.

The end result is a fast, clean and small amount of code. That, I liked. If you are interested, the code that converted the tabs to indents was equally small (altRange is the string from the start of the line to the first non-tab character, and wholeRange is the paragraph where altRange is found):

i = CountCharacter(altRange.Text, vbTab)
altRange.Delete
wholeRange.ParagraphFormat.LeftIndent = InchesToPoints(0.5 * i)
0 Comments

But All I Want Is For It To Go Away

2/28/2013

0 Comments

 
OK, Microsoft, I get it. You want to be helpful in making all my documents format correctly. However, sometimes you go too far. Case in point: automatically inserting a space before or after parentheses and brackets. A behavior that didn't exist in the previous version of Word we used for document drafting (2003), but does now (Word 2010).

In my little niche-world, opening and closing brackets are used in tandem  to denote a range of text that is being marked to be eventually removed. After something has been marked for delete it looks like this in the document (with the --> denoting a tab):
Original
-->(a)-->This is my text to be removed.
Marked up
-->[(a)-->This is my text to be removed.]
 At times, when a set of characters are "bracketed" by the user (all through VBA code, by the way, by selecting text and pressing Delete), the user may have erroneously done it. HORRORS! There is an undelete function also in VBA where the user presses the appropriate keystroke (Ctrl-Delete) and the brackets and all formatting disappear, leaving the text pristine as is shown below. 
What it should be
-->(a)-->This is my text to be removed.
What is happening (notice the extra space between the tab and the opening parenthesis)
--> (a)-->This is my text to be removed.
 The brackets are typically handled quite easily by a one-liner command (after the bracket is identified and set to the range:
     'Set range to the bracket first
         BracketRange.Delete

However, if the situation is as shown above, Word doesn't allow the tab and opening parenthesis to co-exist next to each other; it automatically inserts a space. Manually selecting the bracket and pressing the delete key generates the same result: a space. If you don't select the bracket, but rather place the insertion point immediately preceding the character and press Delete, it will perform as expected, and make the bracket go away. Why, then, does having it selected prior to pressing the delete cause a space? 
 Note that this behavior is the same for trailing parentheses. Also, in addition to tabs, this behavior occurs if the abutting character is an em-space: Asc(8194)
I was able to address this by changing my one line of code to:
     'Set range to the bracket first
        BracketRange.Text = ""

Which effectively does the same thing. My irritation lies in why I had to make the code change in the first place.
0 Comments

Free* Writing Tools For Writers

2/11/2013

0 Comments

 
Got your attention with that magic word "Free" didn't I? I did use an asterisk, and since you are already here, please! read on.

I've been in contact with actual published authors recently. Once I got over the celebrity worship and envy, I wondered about the tools they use to get their thoughts down. This might be why I never quite get around to writing; I often get caught up in the what and how of the mechanics, rather than the actual doing. I also know that it is the truly rare and gifted writer that makes actual money from their efforts, and anything that can save money is a Good Thing.

I am rather familiar with word processing tools, after having written code-based document management systems embedded within the word processor itself, plus years and years of experience formatting document types to exacting specifications. You see, I am essentially lazy – as are most programmers – and instead of doing something repeatedly, I'll figure a way for the computer to do it for me. I leverage many of the existing tools in my work; it's easier than coding a function from scratch (again, I'm lazy) and there are a number of built-in features in most major word processors that – right out of the box – can greatly assist a writer in not only creating consistent format but consistent content as well. 

Since you've probably already forked out some money for the word processor (I say probably, because OpenOffice is free), here are some tips to get the word processor to do more of the work, making the tools themselves free. See how I did that?

I discuss primarily MS Word tools for a couple of reasons: (1) It's what I am using now, and (2) it's common, but these same features are found in OpenOffice and likely in most other major word processors as well, regardless of the platform. Let the easing of the wordsmithing process begin!
AutoCorrect:
This function in word processors  automatically corrects commonly misspelled words. If that weren't valuable enough, it can also be customized to correct intentionally entered gibberish into a meaningful word, phrase or even a sentence unique to your working environment.  

For example you are working on your military thriller,  and one of your characters is Master Gunnery Sergeant Bustamonte-Lopez. Due to the nature of your manuscript, you need to have his title often in the document.  Sure, you can type it in each time, or you can even copy and paste. Though each time you use a copy function for something else, you have to either type it again, or hunt it down to copy again.

Or, you can set up an AutoCorrect entry. To do that, you would first identify the trigger text  - the equivalent of a misspelled word - say "mgst."  Then, you would also identify the full title and name that you want it to be corrected to: "Master Gunnery Sergeant Bustamonte-Lopez." Lock in the correction, and the next time in your document you type "mgst" and press the spacebar, the character's full name and title is entered. Pretty handy. This can work to expand your trigger to any word, phrase or sentence.
NOTE: It's probably not a good idea to use a real word as your trigger, just in case you need to use that word and don't want it always automatically corrected to your expanded form.
 If you need more or totally need your trigger to be a real word not to be automatically corrected , read on about AutoText.
AutoText:
AutoText entries are somewhat similar to autocorrect with some significant added functionality – kind of like making them AutoCorrect’s bigger and much badder brother. In fact, you can bypass using autocorrect entirely and any of the entries you would have made using the autocorrect function instead. AutoText has a number of functionality advantages over autocorrect:
  1. It can encompass multiple paragraphs, varying textual formats, even section breaks.  Essentially, anything you can put into your manuscript, you can replicate with a simple set of keystrokes.
  2. You can use any text as a trigger for creating the text: you are not limited to code words since inserting the AutoText entry requires a specific trigger action (in Word, it’s pressing the F3 key).
  3. AutoText triggers can be saved with the current manuscript, or saved globally for use with any future document. 
You can use it to create page layout changes on the fly, for example if you need to alter from portrait to landscape for an illustration and back. Oh, and have the font size and paragraph formatting different in the altered page. You can repeat the process of establishing the necessary breaks, and formatting, or you can do it once, save it as an AutoText entry, and re-use with only a few keystrokes. The hardest part is creating your block of formatted text - which you have to do anyway. Save it as an AutoText entry and you’re Ready to Rumble™ to use it again and again.
Example: I used MS Word as a report generator for SQL database queries. (There, I just lost two of my now three regular readers.) Depending on the data I returned, I needed to have a differently formatted document, combining font names, sizes and table shape.  Instead of using multiple templates (to be discussed later), I created the different configurations ahead of time, and saved them as AutoText entries. Then, when the user needed to create the report, using a macro (also to be discussed later)  the fully formatted AutoText configuration is placed in the document and filled with the query results. Probably far more complicated than will commonly be used, but a illustrative example of what can be done.
That should give you a couple of ideas about how you can more effectively use your creative time writing, instead of typing. Next up: styles, templates and *gasp* macros.
0 Comments

Been A While

11/15/2012

0 Comments

 
Wow, my last post was a tad over three weeks ago. Seems longer. With a combination of increasing workload, decreasing interest in anything outside of work other than SOMA*, there hasn't been anything even *I* think is worth jotting down. Kids are busy with school  and that is going well, thank Hermes (god of knowledge), Titan (god of intellect) and Athena (goddess of wisdom). As time progresses, I am more and more impressed with Sage Ridge. All I can say is I consider myself fortunate to be able to afford to send my kids there, though it is a fiscal challenge.

A couple of things I have done at work are kind of interesting that I intend to post about in the near future. I need to lock them down a bit more, then I'll post them in all their glory. One is a SQL query generator for non-SQL folks, and the other is a comment and review tool that hides a LOT of the complexity of Microsoft  Word's Track Changes functionality, without hamstringing it. Both very useful for my peeps.

I was going to be doing the timing for the Safe and Sober fundraising race for Carson High School this past Saturday. Despite assuring all pre-registrants at packet pick up on Friday night that the race was going off regardless of weather, the Race Director called it a couple of hours prior to the event due to footing conditions. I can't fault him for erring on the side of caution, but I suppose the claims made the night before were a bit spurious.

For anyone in the northern Nevada area interested in running some shorter and fun trail races, there is a series of them starting this Saturday. Check ccrunners.com if that strikes your fancy.


*Sitting On My Ass
0 Comments

Spell Check Fun in Word 2010

8/31/2012

0 Comments

 
I discovered a little, ahem, shall we say "feature" in Word 2010 when it comes to establishing spelling settings. Granted, what I wanted to do is a little farther along the esoteric line than simple spell checking. What I needed to do is to establish the paragraph style to not be checked, but have a character style that overlays the paragraph get spell checked. Like I said, a little further along the esoteric line.

This is useful in the legal arena where you are (for example) modifying established legal language, but can't actually change it, only identify suggested changes. You'd need any modifications you are making (the character style) to be spell checked, but the underlying legal language (the base paragraph style) cannot be inadvertently, or accidentally changed during a spell check.

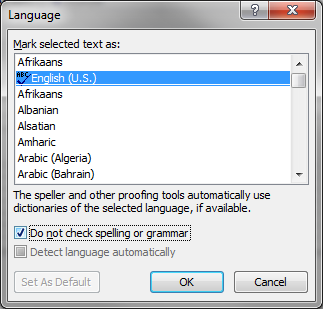
Establishing the underlying paragraph style as don't check spelling is pretty straightforward: in the style definition box click the Format Dropdown and select Language. In the subsequent dialog, click the "Do not check spelling or grammar" box and accept the style change:
Picture
Now is when it gets to be a bit interesting. After you have done that, you can open the style dialog for your character style, and try the same thing. Sure, you can attempt to set "Do not check...", but it doesn't retain the setting. What you need to do is a two-step process.

  1. Change the language of the character style to anything BUT the same language as the underlying paragraph style, and at the same time, tick the box for "Do not check spelling or grammar." Then accept and save the settings. 
  2. Go back to the style definition and select to modify. On this second go-round, change the language BACK to the language you want it to be (assuming you want the language of the character style to be the same as the paragraph style). Changing it back doesn't affect the spelling setting, and the language is matched to the paragraph style.

Voila! You now have a paragraph style that does not check spelling, and a character style overlying it that does.
Exceptions (Exclusions) Dictionary
In the legal world, things can go badly, if, for example, you are identifying a pubic law (instead of a public one) or refer to a statue of limitations rather than a statute of limitations. Both of the words used, are correctly spelled, and likely will not be flagged during normal spelling and grammar checking. Often, they slip through human proofing as well.

The best way to ensure these words do not slip through is to have them show as misspelled all the time, and yes, you can do that. Create a plain text file and put the correctly spelled words you want to have flagged as  in it. Name the file as shown below (Check with Microsoft for the file name for other languages): 

  • English(US): ExcludeDictionaryEN0409.lex 
  • English (UK): ExcludeDictionaryEN0809.lex 
  • English (Canada): ExcludeDictionaryEN1009.lex  


Then save the file to:

                     C:Documents and Settings\user name\Application Data\Microsoft\UProof 

The next time Word is run, the words you've identified in that list will show as misspelled. This way, you will see the words with the red squiggly underline and you can be sure the word is being used in the correct way. 
0 Comments

VBA Code Wrangling

7/25/2012

0 Comments

 
In the environment I am working, we use MS Word - customized to within a hairsbreadth of its life. Across multiple code templates that are loaded when Word starts, document/code templates that are available only when a particular document type is open, and even docm files that are documents that contain code, there is close to 100K lines of VBA code. That's a lot of code to manage. 

As part of the management process, changes and/or updates are necessary. That's pretty much what we do, most of the time, and add new functionality when users dream up something new. All good. The issues I was running into was the time spent looking for a particular function or module that I could leverage as is, or repurpose with limited modifications. 

The search ability built into the Visual Basic Environment is limited to open code documents and templates. And, unlike OpenOffice code, Word's code is not simple text files that can be searched via really handy tools such as GREP. It looked like I had to roll my own. No problem. VBA contains a self-referential method to examine the code itself. What I did was open all the code templates/documents, extract the contents of all the modules' subs and functions, and built a single searchable Word document, color coded and styled to identify template, subs, functions and comments.

After the initial code development and ensuring it all worked, I put it all in a portable docm, slapped an interface on the front and created a few bells and whistles to make using it easier. Now, all I need to do is open the codeoutput.docm file, and double click the start button on the document to launch the options dialog, click the appropriate generate button, and get a fresh cup of coffee while it grinds through all my templates and code documents.

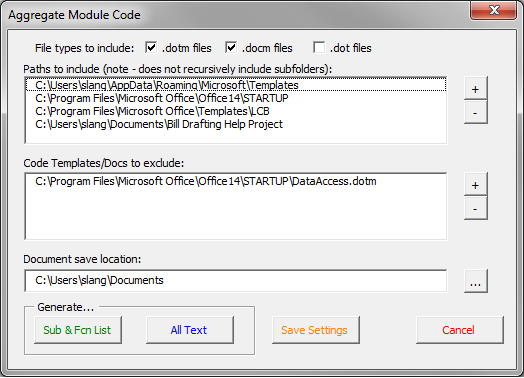
There are a few options that I can select as shown in the image below. You can identify folders of code templates to include, and individual code templates/files to exclude. Both of those processes are point and click using the "+" and "-" buttons. To add, click the "=" and use the folder/file picker to make your selection. To remove, select an item in the list and click "-".
Picture
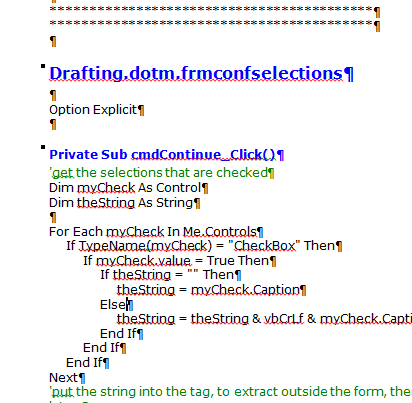
Clicking the "Sub & Fcn List" button generates a three-column table list of all your subs and functions, and includes the first line past the name of the sub or function and saves the file as "Sub_Fcns<yyyymmdd>.docx" in the location where you've indicated. Why the first line past the name, you ask? I includedi t, since I usually put a comment here that indicates the purpose of the sub/function. All public subs/functions are highlighted. Snip below.
Picture
Clicking the "All Text" button generates the whole enchilada. It creates and saves the file as "Code<yyyymmdd>.docx" in the location you've indicated in the form. What I did after that is convert the document to a chm file, so I didn't have to open the document for searching if I was knee deep in Word code. Launch the .chm, and keep it open for reference.  

Each module is styled as Heading1 and each sub or function is styled as Heading2. That way, you can collapse the document to an outline and speed around if you want, and, if you convert it to a .chm file, the styles can become TOC entries. What it looks like is shown below. 
Picture
Click the "Save Settings" button to save the folders to include, files to exclude and file types for the next time you need it. 

If you want to download the docm that does it and modify it for your own purposes, click below and have at it. I'm sure many can improve it. The code has a digital signature verified by Verisign. I'm legit! 
codeoutput.dotm
File Size: 62 kb
File Type: dotm
Download File

0 Comments

MS Word and SVN: A Nice Match - Part 2

4/10/2012

0 Comments

 
Part 1 of this two-part series focused on creating the SVN Repository itself. Part 2 is delving into the specifics of hooking the save action on a document in that folder to automatically add/commit the changed document to the SVN repository. This involves creating an application level event, and code to fire it and the actual SVN code based on your document's location.

Step 1: Create a class module in a dotm that loads at startup.
There needs to be an application hook that is always available. The easiest way to do this is to create a class module in a macro-enabled template residing in the startup folder for MS Word that has application-level events. F0r 2010 that location is typically C:\Program Files\Microsoft Office\Office14\STARTUP. 

Create a macro enabled template and as part of that creation, create a class module. I called mine ApplicationEvents. Code the app event DocumentBeforeSave as it appears below:
Picture
In addition to the code you have in the App_DocumentBeforeSave Sub, you will need to declare a couple of public variable that can access it. At the top of the module in your declaration area, declare your public variables:

Public WithEvents App As Word.Application
Public BSave As New <yourclassmodule dotm name>.ApplicationEvents

Here is the code in the Sub itself for copy and paste purposes:

Private Sub App_DocumentBeforeSave(ByVal Doc As Document, SaveAsUI as Boolean, Cancel As Boolean)
   'Exit this process if the document has never been saved before
    If InStr(ActiveDocument.FullName, "\") = 0 Then Exit Sub
   'save the document
    ActiveDocument.Save
    'hook the SVN actions     
   Call SVNCalls.SVNAddCommit(ActiveDocument.FullName)
End Sub
Now you need to write the SVN call itself. You can put this code anywhere you want, as long as it is somewhere the App_DocumentBeforeSave Sub can see it. So if it is not in the same dotm as the class module, where you do put it has to be referenced by the dotm where the class module lives. For simplicity purposes, you are better off keeping it all together.

Step 2: Code to invoke SVN actions.
The simplest way to do this is to create a bat file on the fly and use the Shell command to tell SVN to execute the bat file. The code below is what is called from the Application event we set up in the startup dotm above:

Function SVNAddCommit(strFullName As String) As Boolean
Const cUpdateFileName as String = "svn_update.bat"Const cClean As String = "svn cleanup"
Const gkMyDrafts as String = "C:\Work_Documents\"

Dim strMsg As String
Dim strSVNString As String
Dim strDraftPath As String
Dim strCommit As String
Dim strAddDelete As String
Dim strBatFile As String
Dim FileNumber As String
Dim strCleanupString as string

On Error GoTo trap
'if the global variable is not instantiated, do so
If BSave.App Is Nothing Then Set BSave.App = Word.Application
'create a cleanup string to ensure the repo is always good to go
strCleanupString = "cd " & Chr(34) & gkMyDrafts & Chr(34) & vbCrLf & cClean & vbCrLf

'create the batfile
strBatFile =gkMyDrafts & cUpdateFileName
'test to see if the document is where the svn is located. If the file being saved is not in my work folder and so not under version control, bail out.
If InStr(strFullName, gkMyDrafts) = 0 Then GoTo Done
 'Create add string. This string will ensure any newly added files to the directory are added to svn. it's ignored if
 'the file is already added
strAddDelete = "svn add " & strFullName & vbCrLf
strMsg = "Saved " & Now()
strCommit = "svn commit --force-log -m "

strSVNString = strCleanupString & strAddDelete & strCommit & Chr(34) & strMsg & Chr(34) & Chr(32) & strFullName

'create a bat file to execute
FileNumber = FreeFile()
Open strBatFile For Output As #FileNumber
Print #FileNumber, strSVNString
Close #FileNumber
'execute the bat file
Shell strBatFile
'All is well, set the function to true and go
SVNAddCommit = True

Done:

    Exit Function

trap:

    Err.Raise (Err.Number)
    GoTo Done
 End Function

That's it. Every time you save a file, it will check to see if it is in the Work_Documents folder, and if it is, it will commit the saved document to the SVN repository, creating a micro-version environment for you.
0 Comments

MS Word and SVN: A Nice Match - Part 1

4/9/2012

0 Comments

 
Versioning files is an important thing in a business world where document creation for a demanding and capricious set of clients is The Way. The document drafter never knows for sure if the file being modified is exactly what is needed/wanted, or if the client will want to revert to a previous version. Often, the situation arises that a document under construction needs to be reset to a point in time a few hours earlier, and moved in a different direction from that point. Other than creating and manually saving multiple versions of the document, there is no really simple method to handle this situation.

Taking a cue from the programming world, I integrated the subversion concept and used it for document construction in MS Word. I wanted to make the process invisible to the user, so that every time they saved their document, it was not only saved as expected in the location they expected, but additionally, a micro-version of the document could then be retrieved exactly as it existed when saved, regardless of additional changes and saves. As any geek knows, this is exactly what SVN does for you; any time a commit action is invoked, the items under version control are written and retrievable in the state they were at that time regardless of subsequent changes. Typically, this is at the end of a coding cycle, but there is no reason why the "cycle" can't be shortened to be every time the user clicks Save for a document, is there? I couldn't think of any, so I went ahead and did it. 

The process is fairly straightforward and can be divided into two clearly defined sets of actions:
  1. Establish the SVN repository to receive all the micro-versions; and,
  2. Hook MS Word actions to SVN commands.
This post will handle the first set of actions, the hooks from MS Word will be in the second.

In order to create the repository, you need to install a subversioning client. I used Tortoise, as it is easy to set up and run. It's an open source project, so feel free to donate. 

After you have downloaded and installed Tortoise, you now have your framework established for creating your repository. You can use the Tortoise interface, or you can do it simply by modifying the following batch file. As displayed, this batch file creates a SVN repository called "drafting" on a network drive. The process creates the remote folder necessary called "work_svn", and it creates the repository for my local C:\Work_Documents folder:
mkdir g:\work_svn
cd /d g:\work_svn
svnadmin create drafting
svn import C:\Work_Documents file:///g:/work_svn/drafting -m "initial import"
rmdir/s/q C:\Work_Documents
svn checkout file:///g:/work_svn/drafting C:\Work_Documents 

Save your text file with a .bat extension and double click it to run. As is the case with everything computer related (and kind of the raison d’être for this post), make sure you back up the folder you are versioning before starting. It's unlikely anything will go wrong, but Murphy gets around.

Coming up next in Part 2: hooking the Save Action of MS Word to automatically commit  the changes to a document in my Work_Documents folder, every time I save it. 
0 Comments

Ribbon Wrestling and Wrangling

3/28/2012

0 Comments

 
I've been in my new digs for about a week or so, and my first and foremost task has been to migrate an "application" that I (mostly) wrote in MS Word 1997-2003 to work in a Windows 7/Office 2010 environment. On the whole, the migration is a smooth seamless process when it comes to processes in the code itself. VBA is VBA regardless of whether the base is 2003 or 2010. The issues start to arise when the time came to create the custom interfaces.

Back in the 2003 days, the way to get the specific functions in front of the user was through either:
  1. customizing the standard menu;
  2. customizing the standard toolbar(s);
  3. creating a new menu;
  4. creating a new toolbar;
As it turned out, I - and the others who worked the project over the years - did all four.

After migrating the templates and code forward to 2010, all the customizations we did still were there, but packaged in a god-awful "Add-Ins" tab (what was formerly known as a menu) at the end of the list of standard tabs. Yuck. Nobody in their right mind would think that an appropriate solution to put before the end user. I certainly couldn't do it in good conscience. So, I started poking around the web, looking for methods, instructions and tools that would help me to:
  • Eliminate the "Add-In" tab and get back to meaningful named tabs;
  • Get back to context sensitive tabs and functions based on document type (template) where only the one custom tab would be visible.
I must say, there really isn't a lot to choose from. And to make it worse, what is good to work with and useful doesn't play natively with 2010, and what is barely functional is what's needed to create 2010 ribbons. That is, unless you want to delve into the file structure itself, which I don't particularly want to.

Microsoft publishes an incredibly lame tool with the glib and catchy name of "Custom UI Editor for Microsoft Office" (hereafter to be known as CUIEMO) that is, well, functional, I guess. I picked it up here. It is needed downstream in my convoluted process. But for creating the ribbon from scratch, ugh. I really wouldn't like it.

The other tool I found is extremely useful, and intuitive. It's drawback is that it doesn't create native 2010 XML; it creates customUI.xml files rather than customUI14.xml files. The cool tool is an AddIn for Excel. Yes, Excel. To customize Word ribbons, I am using Excel. If nothing else, one must learn to be flexible when dealing with Microsoft products!

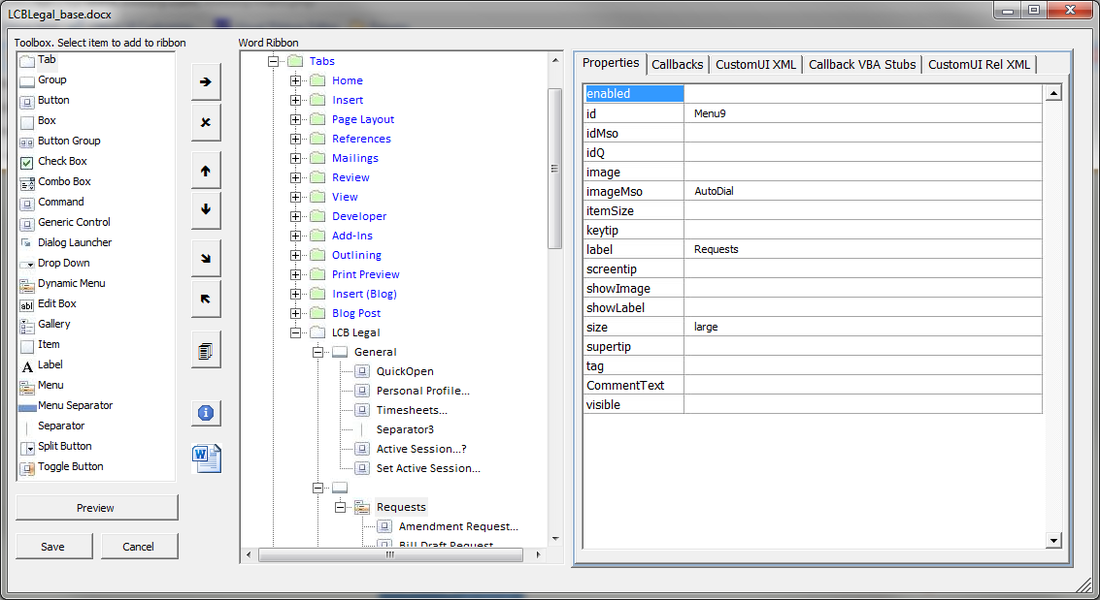
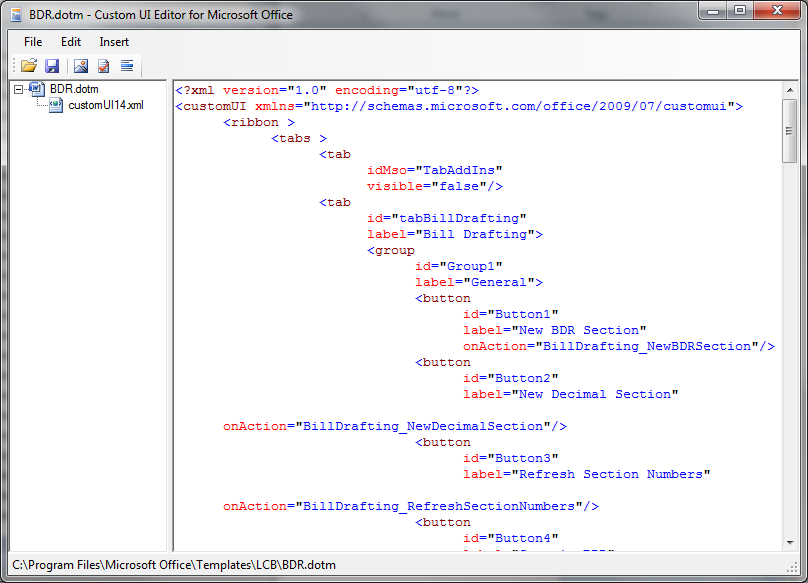
The AddIn is called the RibbonX Visual Designer, developed by Andy Pope, and is available from his website. Below are screen shots between the two tools. I'll let you choose which you think is more useful for designing your custom ribbon. 
Picture
Andy Pope's RibbonX Visual Designer
Picture
Custom UI Editor for Microsoft Office
Since one is useful for designing the ribbon and the other is necessary for creating the actual files necessary, I use the two in conjunction. Here's how.
  1. Open the file (.docm/.dotm) that needs a ribbon in CUIEMO.
  2. From the Insert Menu, select "Insert Office 2010 Custom UI Part."
  3. From the Insert Menu, select "Sample XML | Custom Tab." You should see some XML inserted. We'll be replacing that later with what you really want.
  4. If you want to add icons, select "Insert | Icons..." and add any images you want to be a part of the custom ribbon. Make note of the names, you'll need them later.
  5. Save and close.
  6. Open the .docm/.dotm in the RibbonX Visual Designer Interface.
  7. Customize to your heart's content. If you have decided to use any of the custom images you added to the file above, enter the name in the image property without the extension. If you want to use standard iconography, use the imageMso property.
  8. Click on the CustomUI XML tab.
  9. Select everything between the <ribbon> and </ribbon> tags and Copy.
  10. Save and close.
  11. Open CUIEMO again.
  12. Open the document.
  13. Select the text between the <ribbon> and </ribbon> tags and Paste.
  14. Click the Validate XML button to confirm nothing bad happened.
  15. Save and close. 

Your new ribbon is done! If you need to edit it again later, all you need to do is from Step 6 and beyond. Oh, all your callbacks are also automatically generated, so all you need to do is copy and paste those into your VBA code too. Of course, if you are comfortable simply writing XML code, you can either do it within the CUIEMO environment, but it really sucks with jumping around and flicker. Or you can use your favorite XML editor and copy/paste that too.

 Have at it. I hope this saves someone else the difficulty I had in getting to a functional, custom ribbon. 
0 Comments

Zip-a-dee-doo-dah, zip-a-dee-aye

3/20/2012

0 Comments

 
With a tip of the earworm hat to Disney, I hadn't been in my new position 5 hours before I was unceremoniously dumped into the tech stew that is the Word 2010 object model, and more specifically, the ribbon. I have no one else to blame but myself, however, as the dunking was completely self-inflicted.

It took a few more hours of poking, prodding, reading and trial & error, but I think I am finally gaining some headway in providing customizations, and even dynamic ones at that. Of course, along the way, I made some wrong turns, and went down some apparently blind alleys, but every error-path turned up something useful – just not necessarily useful to me right now.

One of the alleys I followed included a process of making the OS (in this case, Window 7) think a .docx/docm file was a zip file, in order to add some material to it. That wasn't a direction I needed to be heading but…

Everything old is new again (according to Barenaked Ladies), and apparently everything recent is new, too. Making the OS think a document is a zip was the way in which I was able to crack it open and peer at the XML innards using OpenOffice. It seems that is the way of Microsoft Word 2010, too. In addition to recalling my VB/VBA/MS T-SQL stuff, I guess I get to leverage my more recent knowledge of XML inside a document. 

I don't know for sure if I can play directly with the XML at this point, as the direction wasn't where I needed to be heading at this time. But you can be sure I'll be purposefully looking down that alley in the near future. 
0 Comments
<<Previous

    RSS Feed

    Author

    Just a guy out exploring the world. Former world-class never-was endurance runner.

    ​Hit me up, and we'll catch a beer or coffee in your town.


    Follow @slang4201

    Archives

    September 2021
    August 2021
    May 2021
    October 2020
    September 2020
    December 2019
    November 2019
    October 2019
    July 2019
    October 2018
    September 2018
    May 2018
    April 2018
    November 2017
    October 2017
    July 2017
    June 2017
    June 2015
    August 2014
    January 2014
    October 2013
    September 2013
    June 2013
    May 2013
    April 2013
    March 2013
    February 2013
    January 2013
    December 2012
    November 2012
    October 2012
    September 2012
    August 2012
    July 2012
    June 2012
    May 2012
    April 2012
    March 2012
    February 2012
    January 2012
    December 2011
    November 2011
    October 2011
    August 2011
    March 2011
    October 2010
    July 2010
    January 2009
    December 2008
    October 2008

    Categories

    All
    2011
    Alternate Energy
    Android
    Angela Sullivan
    Animals
    Antiques
    Apple
    Ash Canyon
    Astronomy
    AT&T
    Bailout
    Battery
    Bicycling
    Biometrics
    Books
    Carrier Iq
    Carson City
    Centennial
    C Hill
    C-Hill
    Christmas
    Climate
    Clothing
    Coding
    Colorado
    Columbus
    Cramps
    Curiosity
    Dad
    Dardanelles Lake
    Dell
    Dick's Lake
    Dilbert
    Eagle Lake
    Earworms
    Eating Problems
    Eclipse
    Economy
    Education
    Eldorado Canyon
    Energy
    Errors
    Espionage
    Europe 2019
    Evi
    Fallon
    Family
    Fontanillis Lake
    Food
    Garmin
    Geocaching
    Goals
    Google
    Google Earth
    Grouse Lake
    Hiking
    Inov8
    Investing
    Ipad
    Iphone
    Iron Mountain
    Legislatures
    Mac
    Market
    Market Drop
    Mars
    Mctarnahan
    Medicine
    Microsoft Word
    Motivation
    Mountain Biking
    Moving Minutes
    Music
    Nevada Day
    Nfc
    Ohio
    Olympics
    Openoffice
    Opportunity
    Panama 2018
    Paper Airplane
    People
    Politics
    Prison Hill
    Privacy
    Puts
    Puzzles
    Race
    Rant
    Reno
    Retrospective
    Roosevelt
    Running
    Running Dynamics
    Saddest Cities
    Safe & Sober
    Science
    Shoes
    Shopping
    Sierra
    Sierra Canyon
    Slangsploration
    Snl
    Soccer
    Software
    Spasms
    Spirit
    Sullivan Canyon
    Svn
    Tahoe
    Tahoe Rim Trail
    Taxes
    Technology
    Transit
    Travel
    Trees
    Vba
    Velma Lakes
    Venus
    Verizon
    Violin
    Watches
    Weather
    Wolframalpha
    Words
    Wrestling
    Writing
    Xkcd
    Yawbe
    Yoga

This is ALL MINE, I tell you! copyright 2010-2021